
Is putting on your favorite dress proving to be a challenge? Do you find that the sight of your belly fat in the mirror every morning while you’re getting ready to face the day brings you undue stress? If so, you need to get serious about improving your health and fitness right now.
Get A Flat Tummy With Stomach Exercise
Not only does excess abdominal fat make a person look unattractive, but it also increases one’s risk of developing serious health conditions like diabetes and heart disease. Visceral fat, also known as belly fat, is stored internally and contributes to health problems by pressing on vital organs like the digestive tract. This results in the production of toxins that disrupt organ function and increases a person’s susceptibility to health conditions like Type 2 diabetes.
Eating a diet high in fiber is an excellent first step for anyone looking to trim the fat around their midsection. The sugar in soft drinks and even cold-coffee should be considered added sugar and consumed in moderation or avoided altogether. Also avoid processed foods because they are likely to contain high levels of trans fats. You need a combination of a healthy diet and regular physical activity to achieve your fitness and aesthetic goals.
If you want to stay healthy, it’s vitally important to get some sort of workout into your daily routine. The best way to lose belly fat and achieve a flat tummy is to increase your caloric expenditure through a target specific stomach exercise. When you focus on this area, you can finally get rid of the fat and tone your abdominal muscles at the same time, to transform you from flabby to fabulous.
Here are our best 5 flat tummy workout routines that you can start doing at home right now in less than 30 minutes.
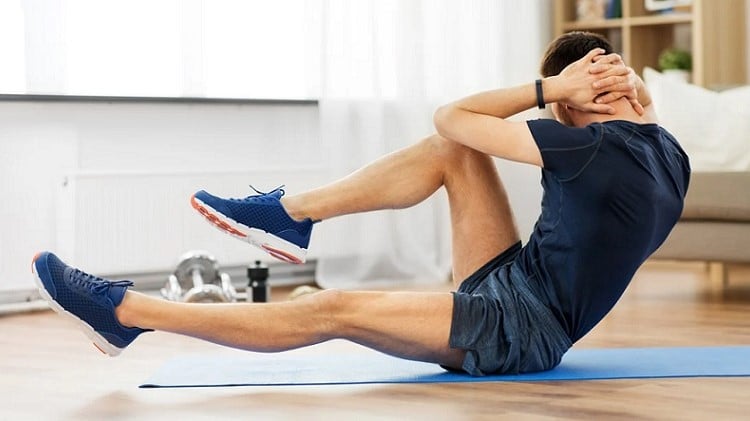
Crunches
- Primary muscles trained: Abs
- Secondary muscles trained: Abs
- Any Equipment needed?: No equipment
Crunches Exercise Instructions
- Get an exercise mat and lie flat on the floor with your knees bent while your feet and back are flat on the ground with your fingers locked as your hands support your head.
- As you lift up your shoulders, try squeezing your abdominal muscles, then hold this contraction for about 2 seconds.
- Gradually return to your starting position in order to repeat the exercise up until you complete your target set.
How to Maintain a Proper Breathing Pattern and Form during Crunches
You should always position your head in a neutral position whenever you do a crunch exercise. Your eyes should be looking up to the ceiling while your chin is at a distance from your chest. Try exhaling as you execute the crunch while keeping your core muscles thoroughly engaged and tight. Your elbows should not be tucked in, but away from your body.
Benefits of Crunches
Crunches help by targeting your abdominal muscle groups. You can strengthen and tone your core with Crunches while also enhancing your posture at the same time. Crunches help to improve your stability and balance, as well as reduce your waistline.
Crunches (Sets & Reps)
You should begin with between 2 to 3 Sets of about 15 to 20 Reps.
Cross Crunches
- Primary muscles trained: Abs
- Secondary muscles trained: Obliques
- Any Equipment needed?: No equipment
Cross Crunches Exercise Instructions
- Bend your knees while lying with your back flat on the floor.
- Place your right leg in a crossed fashion over your left knee while supporting your head with your left hand.
- As you crunch, let your elbows go across your body towards your right knee.
- This exercise should be repeated up to your targeted set/rep count. You should also switch sides for greater results.
How to Maintain a Proper Breathing Pattern and Form during Cross Crunches
Your abdominal muscles should be engaged while executing cross crunches. You need to ensure that your spine is neutral while you use your hand to give support to your neck. Exhale while squeezing your abdominal muscles and try to swing your elbow to knee on your other side even as your legs remain firm and static.
Benefits of Cross Crunches
The main benefit of cross crunches lies in the targeting of both your obliques and abs. In addition to this, cross crunches help in toning your abdominal wall, strengthening your core, and reducing your waistline.
Cross Crunches (Sets & Reps)
You should execute between 20 and 25 cross crunches for each side.
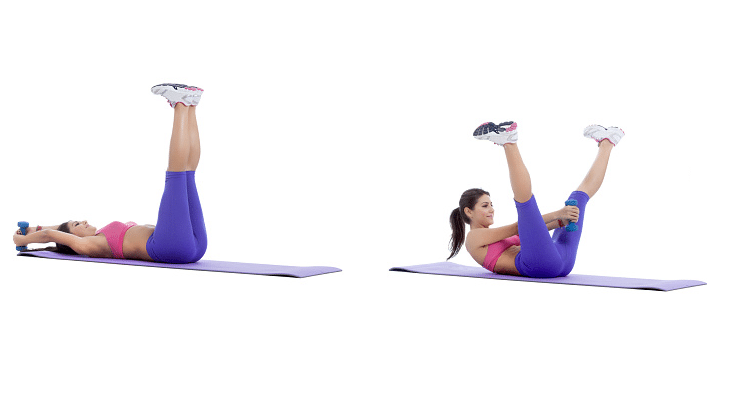
Crunch Chop
- Primary muscles trained: Abs
- Secondary muscles trained: Core, Glutes, Hips, and Upper back
- Any Equipment needed?: No equipment
Crunch Chop Exercise Instructions
- Start by lying on the floor with your back flat on the ground. Your arms should be raised over your head. With the fingers of your hands locked, raise your legs as high as you can.
- Raise your shoulders while opening your legs, then perform a chopping motion with your hands running rapidly down your opened legs.
- Assume your starting position once more and then repeat the chopping sequence until you are able to complete your targeted set.
How to Maintain a Proper Breathing Pattern and Form during Crunch Chop
As you execute the crunch followed by the chopping motion, exhale and ensure that your core is properly engaged. Keep your back, neck, and head neutral with your legs closed while gradually lowering your upper body to the floor as you inhale.
Benefits of Crunch Chop
Crunch Chop will engage your glutes, hips, and core while enhancing endurance and skeletal muscle strength. Your core will be tightened as you achieve a flat tummy and properly toned abs with crunch chop.
Crunch Chop (Sets & Reps)
You should execute between 2 to 3 sets (30 to 60 seconds per set).
Straight Leg Raise
- Primary muscles trained: Abs
- Secondary muscles trained: Lower back
- Any Equipment needed?: No equipment
Straight Leg Raise Exercise Instructions
- Place your hands under your buttocks or to your sides, as you place your back flat to the floor. Make sure that your legs are either bent slightly or completely straightened out.
- Lift your legs up until your body forms an L shape.
- You then pause for a bit in the L shape position, then gradually lower your legs back to your starting position.
- Repeat this exercise in accordance to your targeted set and rep count.
How to Maintain a Proper Breathing Pattern and Form during Straight Leg Raise
You should always engage your abs when executing Straight Leg Raise. Your shoulders, neck and back should also be flat on the floor and you should inhale when lowering your legs.
Benefits of Straight Leg Raise
You can tone your abs and increase its strength with Straight Leg Raise exercise. In addition to this, you will also enhance your flexibility, balance and overall stability.
Straight Leg Raise (Sets & Reps)
Do 2 to 3 sets of between 8 to 12 reps per set. With experience and confidence, you will be able to increase your reps.
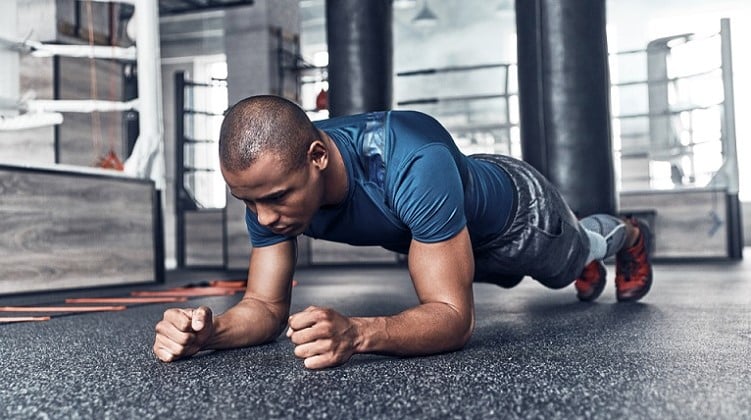
Plank
- Primary muscles trained: Abs
- Secondary muscles trained: Lower back
- Any Equipment needed?: No equipment
Plank Exercise Instructions
- Start by assuming a push up position. You should have your elbows tucked under your shoulders with your feet a hip-width from each other.
- Make sure that you bend your elbows while resting your body weight only on your toes and forearms. You should also maintain a straight line posture during this time.
- You should hold the plank position for as long as you are able to.
How to Maintain a Proper Breathing Pattern and Form during Plank
Make sure that your core is properly engaged with your abs tightened even as your breathing is deep, but measured.
Benefits of Plank
You can build your flexibility and core strength with plank. You will also be able to tone your abs while reducing the size of your waistline. Plank is also known to enhance posture and significantly minimize back pain.
Plank (Sets & Reps)
You should hold the plank posture for as long as you are able to. Maintaining the plank position for 120 seconds is a good start.
Side Plank
- Primary muscles trained: Core
- Secondary muscles trained: Obliques
- Any Equipment needed?: No equipment
Side Plank Exercise Instructions
- Lie down on your side while your body is fully extended.
- Balance your body weight using the side of your foot and forearm, as you raise your body from the floor.
- Maintain a straight line body posture, even as you hold the position for as long as you are able to.
- Switch sides, then repeat the exercise.
How to Maintain a Proper Breathing Pattern and Form during Plank
Your elbow should be tucked beneath your shoulder as you execute the side plank. Make sure that you engage your core and tighten your abs even as you maintain a slow, but steady breathing at the same time.
Benefits of Side Plank
Side Plank helps in developing your core strength while improving flexibility and posture. This exercise will also help in burning abdominal fat as you tighten your abs during the workout.
Side Plank (Sets & Reps)
As a beginner, you should endeavor to perform side planks for a period of 60 seconds for each set.
Conclusion
The keys to having well-toned abs are patience, hard work, discipline, and consistency. Make sure these five flat tummy workouts are a vital part of your daily fitness regimen. For more instructions on these exercises and others, feel free to get in touch with us today.
